| Tip |
|---|
Projects Action.NET can run locally on a single computer or on a mobile device, as well as using a distributed client-server architecture or even in the cloud. The following sections describe how to deploy the application to its execution. |
Setting the server to Start runtime
You can run the project in any of the following ways:
Start manually from the main Action.NET window and the project list: Right-click the project and select from the Run Project menu.
Start manually, when configuring the project, in the Engineering application: go to Run > Startup and click Run Startup.
Start the project automatically, which is the best option for production environments.
The best way to define an automatic product startup is to use the configuration interface available in the Project Management tools in the Server tab.
Click the Settings button to choose the project and the startup form

The configuration window, shown in the figure below, will be shown
The option None is used to not create the automatic triggering of the project. It is recommended to start manually during project development or installation, in which case an operator is required during the startup process. Automatic startup is considered to be the most suitable mode for computers already in production activity.
You should use the Login, and the startup shortcut, when testing the project or on architectures where the application will always run on the same Windows user profile.
Use the Service (Service) of Windows on production servers when you need different Windows users to log on to the computer, keeping the server runtime components indefinitely running.
The Action.NET the program supports the activation of the application from a OPC client, to be in full compliance with OPC specifications. We do not recommend its use because, as a principle of good practice, it is not desirable to allow the remote client to control whether the server-side application is running or not;
The following sections describe what these automatic settings are actually doing. If, for some reason, you need to configure startup without using the configuration tools these commands are the ones that should be used.
Using a shortcut on Windows startup
You can configure a Windows server to automatically start a project using a startup shortcut. The startup shortcut only starts the application when a user signs in to Windows and the application stops working when the user logs off Windows.
This procedure is performed automatically by the system when startup mode is selected, as described in Setting the server to Start runtime". This section will explain how to manually configure the shortcuts.
The start of the project is carried out by the TStartup.exe.
| Note |
|---|
NOTE - When using this example, be sure to change the installation path and version of Action.NET for those that were actually installed on your computer. |
Command line parameters:
/project: Path project and name in double quotation marks
/ username: (optional), user name that will be used to start the server, if you do not specify, the GUEST user will be used.
/redundancy: indicates that server redundancy is being used (requires IP1 and IP2)
/ ip1: IP address of the main server Action.NET
/ Port1: TCP port from the main server Action.NET
/ IP2: IP address of the secondary server Action.NET
/ Port2: TCP port from secondary server Action.NET
The modules that will be started are those configured in the project in Run.Startup.
Examples:
"C:\Program Files (x86)\Spin\Action.NET\an-9.1.1\TStartup.exe" /project:"C:\ActionNet Projects\Project1.tproj"
"C:\Program Files (x86)\Spin\Action.NET\an-9.1.1\TStartup.exe" /project:"C:\ActionNet Projects\Project1.tproj" /port1:3101
Redundancy of Servers:
"C:\Program Files (x86)\Spin\Action.NET\an-9.1.1\TStartup.exe" /project:"C:\ActionNet Projects\Project1.tproj" /username:Administrator /redundancy /ip1:192.168.1.1/port1:3101 / ip2:192.168.1.1.2 /port2:3101
Creating the shortcut
Go to Start > All Programs, and right-click the startup folder, and select Open.
In the Initialize folder, right-click and select New> Shortcut.
In the Create Shortcut window, paste the command above into the field.
If you are not using redundancy, delete the redundancy portion of the text.
Type or paste the full command line, examples: "C:\Program Files (x86)\Spin\Action.NET\an-9.1.1.1\TStartup.exe" /project:"C:\ActionNet Projects\Project1.tproj"
Click Next.
Type a name for the shortcut.
Click Finish.
When you restart the computer, the project will start automatically.
| Note |
|---|
WARNING - In the examples below, be sure to change the |
Using a Windows Service for Startup
You can configure a Windows server to automatically start a project when the computer starts up, using a Service windows. The Windows service starts the application as soon as the computer is turned on and the Windows operating system starts, even if no users have logged on to Windows.
This procedure is performed automatically by the system when selected for Startup, as described "Setting the Server to Start runtime" . This section will explain how to configure it manually.
| Info |
|---|
NOTE - These methods do not start the client (UI with the monitors). To automate client startup, "Automatically starting Windows clients." |
Use the Windows Service only on production servers that you are not using as engineering stations, and only if you need the ability to differentiate Windows users when logging in while the project is running.
The first steps in the following procedure are necessary for you to configure the Windows Service.
To run the application as a Windows service:
Go to Info> Project> Redundancy.
Enter or select the information as needed.
Field
Description
Enable Configuration
Select to enable this setting
Primary Server IP and Port
Enter the IP address and the primary server port
Secondary Server IP and Port
Enter the IP address and secondary server port, if any.
On Primary Startup
Select the desired option.
Historian Replication
Select how the historian's replication should be tartada.
Connection Timeout
Maximum time allowed for connection, in seconds, before socing to the secondary server.
Server Command Line
Read-only field loaded according to the opposed from the previous fields. Click Copy to Clipboard to copy the command to be used in shortcuts.
Rich client command
The command line to break a Rich Client with the selected parameters for the project
Smart Client URL
The URL to access the Smart Client with the project parameters.
Web client URL
The URL to access the WEB Client with the project parameters.
View-Only
If checked, applies the View-Only parameter to the Rich and Smart Clients URLs.
Windows Authentication
If checked, applies the Windows Authentication parameter to the Rich and Smart Clients URLs.
Next to the server command-line field, click Copy to Clipboard.
You will copy the read-only field, displayed based on the fields above it.
Open a text file, paste, and continue with steps 5 through 7 in this file.
If you are not using redundancy, you must delete the redundancy part of the text.
At the beginning of the command line, type or paste the full path into the Action.NET and place quotation marks around the text
It should look something like the following:
"C:\Program Files (x86)\Spin\Action.NET\an-9.1\tStartup.exe"
Before the text "tproj", type or paste the full path to the project.
It should look like this:
/project:C:\Action.NET Projects\<project_name>.tpro
The full command line should look something like this:
"C:\Program Files (x86)\Spin\Action.NET\an-9.1\tStartup.exe" /project:/ project:C:\Action.NET Projects\<project_name>.tproj /username:<username>
Leave the text file open for use in step 10.
In the DOS prompt, go to < theNET Framework Installation Path > run the following command:
installutil <InstallPath>\<an-version>\TStartupAsService.exe
Example:
C:\Windows\Microsoft.NET\Framework\v2.0.50727>installutil c:\Program files\Spin\Action.NET\an-2016.1\TStartupAsService.exe
Copy and paste the command you created into the text file.
. In Windows Registry, configure the parameters at:
"HKEY_LOCAL_MACHINE\SYSTEM\CurrentControlSet\services\TStartup\Image Path"
Example:
In Windows Services (under Administrative Tools), set "TStartup Service" to Automatic, so that the selected project will start when the computer starts.
Configuration for Remote Clients
Windows Rich Clients
You can deploy your application for use by Windows Rich Clients. The Table 1 describes how windows rich client implementation works.
Table 1: Installation of Action.NET to use Windows rich client
Installation
Install the Action.NET the client computer. See "Installing the Action.NET"
How start
Run the TRichClient program.exe. For an example of how to automatically start the customer when a user logs in to the
Windows, see "Automatically starting Windows clients"
Table 1: Installation of Action.NET to use Windows rich client
Execution
It runs in its own window. This enables strong user security, including the ability to disable the Windows task keying mechanism, according to the project login
running.
When running TRichClientt.exe on 64-bit machines, the application runs on 64-bit native code. If you need to run the TRichClient program.exe. For an example of how to automatically start the client when a user logs in to Windows, see "Automatically starting Windows clients" to the 32-bit version, for example, to ensure compatibility with legacy COM and Active-X COM components, you can use the TRichClient32.exe program.
Communication
Communicates with the server using WCF (configurable port, default 3101).
Windows Smart Clients
You can deploy your application for use in the form of Windows Smart Clients.
The Smart Client works like the Rich Client, that is, they work the same way, but the smart client uses the ClickOnce installation ™. This technology allows you to have the same functionality as the Rich Client, but without having to install Action.NET on your computer.
The first time you access the application, the system automatically transfers the components needed to run the application. The next time you access the application, the system checks whether the local cache is the same version of the application that is on the server and, if necessary, updates the local cache before running the application. If the version is the same, the application starts immediately.
Table 2 describes how smart client deployment and execution works.
Table 2: Deployment of Action.NET as Windows Smart Client
Installation
Does not require installation. You only need dotNET Framework 4.0 and Internet Explorer 8.0 or later on the client computer.
The first time you launch the application, it will automatically download the required components from the server. Every time the application starts, it automatically checks whether a new version is available on the server.
How to start
From Internet Explorer (or a shortcut) go to the URL: http://<ServerIPAddressorName>/an-2014.1/TSmartClient.application
For an example of how to automatically start the client when a user signs in to Windows, see "Starting automatically Windows Clients"
Execution
Works exactly the same as the Rich Client. The features of Rich Client and SmartClient are the same, only installation and activation methods are different.
Communication
Communicates with the server using WCF (configurable port, default 3101).
Windows Web Clients
You can deploy your application for use as Windows Web clients. Table 3 describes how the Web Client implementation works.
Table 3: Deployment of Action.NET as Windows web client
Installation
Does not require installation. You only need dot NET Framework 4.0 and Internet Explorer 8.0 or later on the client computer.
The first time you start the application, it will automatically download from the server the required components. Every time the application starts, it automatically checks whether a new version is available on the server.
How to start
From Internet Explorer (or a shortcut) go to the URL: http://<ServerIPAddressorName>/an-2014.1/TWebClient.Xbap
For an example of how to automatically start the client when a user signs in to Windows, see "Starting automatically Windows clients"
Execution
Runs inside a web browser window using "Partial Trust" (Sandbox Security).
Communication
Communicates with the server using HTTP or HTTPS (port 80).
Automatically starting Windows clients
You can create a shortcut to the appropriate executable, depending on the type of client, to automatically launch the application on a Windows client. You can create the shortcut on the desktop or place it in the startup folder as described below.
For the web client, you can also configure the application as the home page in Internet Explorer.
Go to Start> All Programs
Right-click the Windows startup folder.
Select Open to open the startup folder.
In the startup folder, right-click and select New> Shortcut.
In the Create Shortcut window, paste into the field that displays.
If you are not using redundancy, delete the redundancy part of the text.
Proceed in one of the following ways:
For a Rich Client - At the beginning of the command line, type or paste the full path to the installation folder Action.NET and place quotation marks around it.
It must be something like this:
"C:\Program Files (x86)\Spin\Action.NET\an-2014.1.3\TRichClient.exe" / ip1:<IP_address>
For a Smart or Web client - At the beginning of the command line, type or paste the full path into the Internet Explorer installation folder and place quotation marks around it.
| Tip |
|---|
Projects Action.NET can run locally on a single computer or on a mobile device, as well as using a distributed client-server architecture or even in the cloud. The following sections describe how to deploy the application to its execution. |
Setting the server to Start runtime
You can run the project in any of the following ways:
Start manually from the main Action.NET window and the project list: Right-click the project and select from the Run Project menu.
Start manually, when configuring the project, in the Engineering application: go to Run > Startup and click Run Startup.
Start the project automatically, which is the best option for production environments.
The best way to define an automatic product startup is to use the configuration interface available in the Project Management tools in the Server tab.
Click the Settings button to choose the project and the startup form

The configuration window, shown in the figure below, will be shown
The option None is used to not create the automatic triggering of the project. It is recommended to start manually during project development or installation, in which case an operator is required during the startup process. Automatic startup is considered to be the most suitable mode for computers already in production activity.
You should use the Login, and the startup shortcut, when testing the project or on architectures where the application will always run on the same Windows user profile.
Use the Service (Service) of Windows on production servers when you need different Windows users to log on to the computer, keeping the server runtime components indefinitely running.
The Action.NET the program supports the activation of the application from a OPC client, to be in full compliance with OPC specifications. We do not recommend its use because, as a principle of good practice, it is not desirable to allow the remote client to control whether the server-side application is running or not;
The following sections describe what these automatic settings are actually doing. If, for some reason, you need to configure startup without using the configuration tools these commands are the ones that should be used.
Using a shortcut on Windows startup
You can configure a Windows server to automatically start a project using a startup shortcut. The startup shortcut only starts the application when a user signs in to Windows and the application stops working when the user logs off Windows.
This procedure is performed automatically by the system when startup mode is selected, as described in Setting the server to Start runtime". This section will explain how to manually configure the shortcuts.
The start of the project is carried out by the TStartup.exe.
| Note |
|---|
NOTE - When using this example, be sure to change the installation path and version of Action.NET for those that were actually installed on your computer. |
Command line parameters:
/project: Path project and name in double quotation marks
/ username: (optional), user name that will be used to start the server, if you do not specify, the GUEST user will be used.
/redundancy: indicates that server redundancy is being used (requires IP1 and IP2)
/ ip1: IP address of the main server Action.NET
/ Port1: TCP port from the main server Action.NET
/ IP2: IP address of the secondary server Action.NET
/ Port2: TCP port from secondary server Action.NET
The modules that will be started are those configured in the project in Run.Startup.
Examples:
"C:\Program Files (x86)\Spin\Action.NET\an-9.1.1\TStartup.exe" /project:"C:\ActionNet Projects\Project1.tproj"
"C:\Program Files (x86)\Spin\Action.NET\an-9.1.1\TStartup.exe" /project:"C:\ActionNet Projects\Project1.tproj" /port1:3101
Redundancy of Servers:
"C:\Program Files (x86)\Spin\Action.NET\an-9.1.1\TStartup.exe" /project:"C:\ActionNet Projects\Project1.tproj" /username:Administrator /redundancy /ip1:192.168.1.1/port1:3101 / ip2:192.168.1.1.2 /port2:3101
Creating the shortcut
Go to Start > All Programs, and right-click the startup folder, and select Open.
In the Initialize folder, right-click and select New> Shortcut.
In the Create Shortcut window, paste the command above into the field.
If you are not using redundancy, delete the redundancy portion of the text.
Type or paste the full command line, examples: "C:\Program Files (x86)\Spin\Action.NET\an-9.1.1.1\TStartup.exe" /project:"C:\ActionNet Projects\Project1.tproj"
Click Next.
Type a name for the shortcut.
Click Finish.
When you restart the computer, the project will start automatically.
| Note |
|---|
WARNING - In the examples below, be sure to change the |
Using a Windows Service for Startup
You can configure a Windows server to automatically start a project when the computer starts up, using a Service windows. The Windows service starts the application as soon as the computer is turned on and the Windows operating system starts, even if no users have logged on to Windows.
This procedure is performed automatically by the system when selected for Startup, as described "Setting the Server to Start runtime" . This section will explain how to configure it manually.
| Info |
|---|
NOTE - These methods do not start the client (UI with the monitors). To automate client startup, "Automatically starting Windows clients." |
Use the Windows Service only on production servers that you are not using as engineering stations, and only if you need the ability to differentiate Windows users when logging in while the project is running.
The first steps in the following procedure are necessary for you to configure the Windows Service.
To run the application as a Windows service:
Go to Info> Project> Redundancy.
Enter or select the information as needed.
Field | Description |
Enable Configuration | Select to enable this setting |
Primary Server IP and Port | Enter the IP address and the primary server port |
Secondary Server IP and Port | Enter the IP address and secondary server port, if any. |
On Primary Startup | Select the desired option. |
Historian Replication | Select how the historian's replication should be tartada. |
Connection Timeout | Maximum time allowed for connection, in seconds, before socing to the secondary server. |
Server Command Line | Read-only field loaded according to the opposed from the previous fields. Click Copy to Clipboard to copy the command to be used in shortcuts. |
Rich client command | The command line to break a Rich Client with the selected parameters for the project |
Smart Client URL | The URL to access the Smart Client with the project parameters. |
Web client URL | The URL to access the WEB Client with the project parameters. |
View-Only | If checked, applies the View-Only parameter to the Rich and Smart Clients URLs. |
Windows Authentication | If checked, applies the Windows Authentication parameter to the Rich and Smart Clients URLs. |
Next to the server command-line field, click Copy to Clipboard.
You will copy the read-only field, displayed based on the fields above it.
Open a text file, paste, and continue with steps 5 through 7 in this file.
If you are not using redundancy, you must delete the redundancy part of the text.
At the beginning of the command line, type or paste the full path into the Action.NET and place quotation marks around the text
It should look something like the following:
"C:\Program Files (x86)\Spin\Action.NET\an-9.1\tStartup.exe"
Before the text "tproj", type or paste the full path to the project.
It should look like this:
/project:C:\Action.NET Projects\<project_name>.tpro
The full command line should look something like this:
"C:\Program Files (x86)\Spin\Action.NET\an-9.1\tStartup.exe" /project:/ project:C:\Action.NET Projects\<project_name>.tproj /username:<username>
Leave the text file open for use in step 10.
In the DOS prompt, go to < theNET Framework Installation Path > run the following command:
installutil <InstallPath>\<an-version>\TStartupAsService.exe
Example:
C:\Windows\Microsoft.NET\Framework\v2.0.50727>installutil c:\Program files\Spin\Action.NET\an-2016.1\TStartupAsService.exe
Copy and paste the command you created into the text file.
. In Windows Registry, configure the parameters at:
"HKEY_LOCAL_MACHINE\SYSTEM\CurrentControlSet\services\TStartup\Image Path"
Example:
"c:\\Spin\Action.NET\an-2016.1\TStartupAsService.exe" "/project:C:\Action.NET Projects\Project1.tproj""HKEY_LOCAL_MACHINE\SYSTEM\CurrentControlSet\services\TStartup\ImagePath"
In Windows Services (under Administrative Tools), set "TStartup Service" to Automatic, so that the selected project will start when the computer starts.
TStartup Parameters
TStartup.exe is the executable which runs the project. There are many different parameters that can be added to the TStartup command line that provide more features to a project as well as more debugging tools.
In order to use TStartup.exe, you’ll need to create a shortcut for the executable and edit the shortcut properties to add the parameters.
Launching the Application
Creating a TStartup Shortcut
Go to your product’s installation folder (see usual path below), and search for the TStartup.exe application. Right-click on it, select Create Shortcut, and copy the file. Then, paste it in any folder.
|
Then, right-click on the created shortcut, select the Properties, and change the Target field (command line) as you desire.

Creating a .bat file
A batch file is a script file in DOS and Microsoft Windows. It consists of a series of commands that are executed by the command-line interpreter and are stored in a plain text file.
The following steps describe how to launch a customizable TStartup application with a .bat file:
Create a text file (extension .txt)
Write the full command line that will launch the application, as seen below
|
Add the desired additional parameters (see examples in the next sections)
Save and close the file
Right-click on the icon and change its extension name form .tex to .bat. A warning message will popup on the screen. Click on ’Yes’.

Double-click on the newly created file to launch the TStartup application.
Required Parameters
The most important parameter for launching your application is related to the Project file. It is the only one that is really necessary for the command line.
The syntax for this parameter is presented below.
|
After that parameter, you can add any of the remaining available parameters.
Advanced Diagnostic Information
The list below contains the available parameters that can be added to a project's startup for additional debugging information.
/debugstart
The logs are created in the folder:
C:\ProgramData\<ProductName>
It’s worth remembering that this folder is used to log system errors. When a critical error occur, this folder will contain important information that can be used to solve the issue.
The target of your shortcut will be something like this:
"C:\Program Files (x86)\<CompanyName>\<ProductName>\<ProductVersion>\TStartup.exe" /Project:"C:\ Projects\Project4.tproj" /debugstart
/AutoRunDiagnostics: (time in minutes)
The logs are created in the folder:
C:\ProgramData\<ProductName>
The target of your shortcut will be something like this:
"C:\Program Files (x86)\<CompanyName>\<ProductName>\<ProductVersion>\TStartup.exe" /Project:"C:\ Projects\Project4.tproj"/AutoRunDiagnostics:30
/LogDeviceWriteStartup
The logs are created in the folder:
C:\ProgramData\<ProductName>\Device
The target of your shortcut will be something like this:
"C:\Program Files (x86)
\Internet Explorer\iexplorer.exe" http://<IP_address>/an- 2014.1/TSmartClient.application\<CompanyName>\<ProductName>\<ProductVersion>\TStartup.exe" /Project:"C:\ Projects\Project4.tproj"/LogDeviceWriteStartup
Redundancy
/redundancy
It has no parameters. It just needs to be included to enable redundancy.
The target of your shortcut will be something like this:
"C:\Program Files (x86)\
Internet Explorer\iexplorer<CompanyName>\<ProductName>\<ProductVersion>\TStartup.exe"
http://<IP_address>/an- 2014.1/TWebClient.XbapClick Next.
Type a name for the shortcut.
Click Finish.
The next time you restart your computer, the project starts automatically.
iOS, iPhone, and iPad customers
You can deploy your app for use by iOS clients: iPhone, iPad, and iTouch. For other tablets, contact support.
Table 4 describes how iOS installation works.
Table 4: Installing the Action.NET as an iOS client
Installation
Install the SCADA HMI client app from the Apple Store.
How to start
Launch the Hmi SCADA client application and follow the initial configuration options.
Execution
On iOS, the app runs natively, thus providing higher performance, greater security, and access to native graphics components compared to other applications using Client Terminal, Remote Desktop, or web HTML.
Communication
Communicates with the server by calling a web service using port 80. The server must be on the same local network or VPN as the iOS device, or it may have a public IP address as long as access
HTTP is enabled.
To deploy to an iOS device:
From your iOS device, tap the App Store icon.
You can also go to the Apple App Store from iTunes.
Browse and install the Hmi SCADA client application.
Launch the SCADA HMI Client application.
Enter the following information:
Field
Description
Host Server
IP address or project server name.
Port
Door 80.
Polling
Sets the refresh rate between the client and the server, expressed in rooms of a second. The default value of 1 means that the client receives new data from the server every 250 ms. When connecting to servers located on Internet or low bandwidth networks, this value should be increased. For more information, see the app's help.
User
User name as configured in the project. The default is GUEST
Password
Password associated with the user name in the project..
Project
Project name on the remote server.
Tap Login.
The graphics and screens are downloaded, and then the application starts. The application when starting for the first time may take a little longer than in subsequent startups.
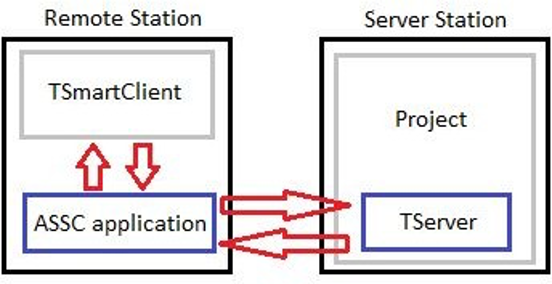
Auto Start Windows Smart Client
The Auto-Start SmartClient (ASSC) watchdog application is used to automatically launch the TSmartClient on the remote stations of your project. This application requires software version 2014.2.12 or newer. When installing the software, the AutoStartSmartClient.exe will be added to the installation folder.
In the current version, the files AutoStartSmartClient.exe and AutoStartSmartClient.exe.config must be manually copied from the server station installation folder to a folder on the remote station. After copying the ASSC application to the remote station, the user must configure the .config file or the ASSC will start with several parameters that will take priority over any parameters in the .config file.
The remote station must have already installed Microsoft .Net Framework 4.0 or 4.5.
When the ASSC application is running on the remote station, the ASSC application checks every 30 seconds to see if the TSmartClient is running or the user can set a time parameter for the application's scan frequency.
If the TSmartClient is not running, the ASSC application consults its configuration parameters to verify that there is communication with the server station. If the ASSC application is able to connect to the project through the TServer on the server station, it restarts the TSmartClient on the remote station using the url parameter.
Parameter Setting
Before you run the ASSC application, you need to set the parameters in the AutoStartSmartClient.exe.config or you can pass the parameters using a shortcut file.
The available parameters are:
| Info |
|---|
|
Configuration Example
To pass the parameters in the file AutoStartSmartClient.exe, you must create a shortcut to the file in a folder on the remote station. To do this, go to the installation folder and look for the executable.
Right-click the file and select Create shortcut. Then place it in the desired folder. To finish the setup, right-click the newly created shortcut and select Properties.
Configure the file path to:
| Code Block |
|---|
AutoStartSmartClient.exe /url:http://<IP Address>/<binary folder>/TSmartClient.application /timer:<seconds>
E.g.: AutoStartSmartClient.exe /url:http://192.168.15.31/xx-8.1/TSmartClient.application /timer:30 |
The url can be copied from the Engineering environment in Info> redundancy> smart client URL. See the image below:

After setting the settings, double-click the shortcut file and keep it running. You should see an open window with a message saying that the application is waiting for tserver to run. Once the project runs, the TSmartClient opens automatically.
The TSmartClient needs a WebServer (ISS or TWebServer) working correctly on the server computer.

On this page:
/Project:"C:\ Projects\Project4.tproj"/redundancy
/autoswitch
It has no parameters. If included, the Primary takes over as the Active node if the secondary was acting as the Active.
The target of your shortcut will be something like this:
"C:\Program Files (x86)\<CompanyName>\<ProductName>\<ProductVersion>\TStartup.exe" /Project:"C:\ Projects\Project4.tproj"/redundancy /autoswitch
/timeautoswitch
The number of seconds the Primary will wait before becoming active if the autoswitch option is enabled. This is typically set to 60 seconds.
The target of your shortcut will be something like this:
"C:\Program Files (x86)\<CompanyName>\<ProductName>\<ProductVersion>\TStartup.exe" /Project:"C:\ Projects\Project4.tproj"/redundancy /timeautoswitch:30
/ip1
The Primary Server Name or IP
The target of your shortcut will be something like this:
"C:\Program Files (x86)\<CompanyName>\<ProductName>\<ProductVersion>\TStartup.exe" /Project:"C:\ Projects\Project4.tproj" /ip1:<IpAddress>
/port1
The Port number of the primary, default is 3101.
The target of your shortcut will be something like this:
"C:\Program Files (x86)\<CompanyName>\<ProductName>\<ProductVersion>\TStartup.exe" /Project:"C:\ Projects\Project4.tproj" /ip1:<IpAddress> /port1:<PortNumber>
/ip2
The Secondary Server Name or IP
The target of your shortcut will be something like this:
"C:\Program Files (x86)\<CompanyName>\<ProductName>\<ProductVersion>\TStartup.exe" /Project:"C:\ Projects\Project4.tproj" /ip1:<IpAddress> /ip2:<IpAddress>
/port2
The Port number for the secondary, default is 3101.
The target of your shortcut will be something like this:
"C:\Program Files (x86)\<CompanyName>\<ProductName>\<ProductVersion>\TStartup.exe" /Project:"C:\ Projects\Project4.tproj"/ip1:<IpAddress> /ip2:<IpAddress> /port2:<PortNumber>
/connectiontimeout
The Watch-dog timeout in seconds that is found on Info > Redundancy.
The target of your shortcut will be something like this:
"C:\Program Files (x86)\<CompanyName>\<ProductName>\<ProductVersion>\TStartup.exe" /Project:"C:\ Projects\Project4.tproj" /connectiontimeout:5
/connectionretry
The Connection retry attempts. By default is set as 1.
/ProjectIPPath
The path of the project on the remote server.
The ProjectIPPath is used by the system to allow one station to automatically update the project in the redundant pair when doing online project changes and HotStart commands.
Example:
/ProjectIPPath:192.168.0.1;C:\Projects\test.tproj
Note
The TimeAutoSwitch time is connected when you are using the /autoswitch option. In this scenario, when the computer designed as the Primary starts, it will ”auto switch” from standby to active after it starts.
It is important that the switch happens only after the process had time to get all the synchronization from the active computer. Typically, 60 seconds should be enough for that, but you should increase that settings for large projects or slow networks.
Other Useful Parameters
/username
The RuntimeUser that is logged in.
The target of your shortcut will be something like this:
"C:\Program Files (x86)\<CompanyName>\<ProductName>\<ProductVersion>\TStartup.exe" /Project:"C:\ Projects\Project4.tproj" /username:<UserName>
/password
The custom password to log in as the user defined above.
The target of your shortcut will be something like this:
"C:\Program Files (x86)\<CompanyName>\<ProductName>\<ProductVersion>\TStartup.exe" /Project:"C:\ Projects\Project4.tproj"/username:<UserName> /password:<Password>
/wa
Flag (True or False) to set if Windows Authentication will be used.
True:
False = Remote
The target of your shortcut will be something like this:
"C:\Program Files (x86)\<CompanyName>\<ProductName>\<ProductVersion>\TStartup.exe" /Project:"C:\ Projects\Project4.tproj" /wa:true
/port1WA
The listening port using Windows Authentication
The target of your shortcut will be something like this:
"C:\Program Files (x86)\<CompanyName>\<ProductName>\<ProductVersion>\TStartup.exe" /Project:"C:\ Projects\Project4.tproj" /wa:true /port1Wa:<PortNumber>
/NumberOfDevicesAtSameTime
The number of devices online at the same time. By default is set as 3.
The target of your shortcut will be something like this:
"C:\Program Files (x86)\<CompanyName>\<ProductName>\<ProductVersion>\TStartup.exe" /Project:"C:\ Projects\Project4.tproj" /NumberOfDevicesAtSameTime:1
/TimeBetweenModules
The waiting time between modules being started. Time in seconds.
The target of your shortcut will be something like this:
"C:\Program Files (x86)\<CompanyName>\<ProductName>\<ProductVersion>\TStartup.exe" /Project:"C:\ Projects\Project4.tproj" /TimeBetweenModules:30
/nocache
Flag (true or false) to see if project will use data stored in cache or not. For SmartClient Only.
The target of your shortcut will be something like this:
http://<IpAddress>/<ProductVersion>/TSmartClient.application?nocache=true
| Scroll ignore | ||||||||||||||||
|---|---|---|---|---|---|---|---|---|---|---|---|---|---|---|---|---|
| ||||||||||||||||
On this page: |