Configuration for Remote Clients
This documentation shows detailed information to setting up Action.Net to run Remote Clients
Windows Rich Clients
You can deploy your application for use by Windows Rich Clients. The Table 1 describes how windows rich client implementation works.
Table 1: Installation of Action.NET to use Windows rich client
Installation | Install the Action.NET the client computer. See "Installing the Action.NET" |
How start | Run the TRichClient program.exe. For an example of how to automatically start the customer when a user logs in to the |
Table 1: Installation of Action.NET to use Windows rich client
Execution | It runs in its own window. This enables strong user security, including the ability to disable the Windows task keying mechanism, according to the project login |
Communication | Communicates with the server using WCF (configurable port, default 3101). |
Windows Smart Clients
You can deploy your application for use in the form of Windows Smart Clients.
The Smart Client works like the Rich Client, that is, they work the same way, but the smart client uses the ClickOnce installation ™. This technology allows you to have the same functionality as the Rich Client, but without having to install Action.NET on your computer.
The first time you access the application, the system automatically transfers the components needed to run the application. The next time you access the application, the system checks whether the local cache is the same version of the application that is on the server and, if necessary, updates the local cache before running the application. If the version is the same, the application starts immediately.
Table 2 describes how smart client deployment and execution works.
Table 2: Deployment of Action.NET as Windows Smart Client
Installation | Does not require installation. You only need dotNET Framework 4.0 and Internet Explorer 8.0 or later on the client computer. | |
How to start | From Internet Explorer (or a shortcut) go to the URL: http://<ServerIPAddressorName>/an-2014.1/TSmartClient.application | |
Execution | Works exactly the same as the Rich Client. The features of Rich Client and SmartClient are the same, only installation and activation methods are different. | |
Communication | Communicates with the server using WCF (configurable port, default 3101). |
Windows Web Clients
You can deploy your application for use as Windows Web clients. Table 3 describes how the Web Client implementation works.
Table 3: Deployment of Action.NET as Windows web client
Installation | Does not require installation. You only need dot NET Framework 4.0 and Internet Explorer 8.0 or later on the client computer. |
How to start | From Internet Explorer (or a shortcut) go to the URL: http://<ServerIPAddressorName>/an-2014.1/TWebClient.Xbap |
Execution | Runs inside a web browser window using "Partial Trust" (Sandbox Security). |
Communication | Communicates with the server using HTTP or HTTPS (port 80). |
Automatically starting Windows clients
You can create a shortcut to the appropriate executable, depending on the type of client, to automatically launch the application on a Windows client. You can create the shortcut on the desktop or place it in the startup folder as described below.
For the web client, you can also configure the application as the home page in Internet Explorer.
Go to Start> All Programs
Right-click the Windows startup folder.
Select Open to open the startup folder.
In the startup folder, right-click and select New> Shortcut.
In the Create Shortcut window, paste into the field that displays.
If you are not using redundancy, delete the redundancy part of the text.
Proceed in one of the following ways:
For a Rich Client - At the beginning of the command line, type or paste the full path to the installation folder Action.NET and place quotation marks around it.
It must be something like this:
"C:\Program Files (x86)\Spin\Action.NET\an-2014.1.3\TRichClient.exe" / ip1:<IP_address>
For a Smart or Web client - At the beginning of the command line, type or paste the full path into the Internet Explorer installation folder and place quotation marks around it.
It must be something like this:
"C:\Program Files (x86)\Internet Explorer\iexplorer.exe" http://<IP_address>/an- 2014.1/TSmartClient.application
"C:\Program Files (x86)\Internet Explorer\iexplorer.exe" http://<IP_address>/an- 2014.1/TWebClient.Xbap
Click Next.
Type a name for the shortcut.
Click Finish.
The next time you restart your computer, the project starts automatically.
iOS, iPhone, and iPad customers
You can deploy your app for use by iOS clients: iPhone, iPad, and iTouch. For other tablets, contact support.
Table 4 describes how iOS installation works.
Table 4: Installing the Action.NET as an iOS client
Installation | Install the SCADA HMI client app from the Apple Store. |
How to start | Launch the Hmi SCADA client application and follow the initial configuration options. |
Execution | On iOS, the app runs natively, thus providing higher performance, greater security, and access to native graphics components compared to other applications using Client Terminal, Remote Desktop, or web HTML. |
Communication | Communicates with the server by calling a web service using port 80. The server must be on the same local network or VPN as the iOS device, or it may have a public IP address as long as access |
To deploy to an iOS device:
From your iOS device, tap the App Store icon.
You can also go to the Apple App Store from iTunes.
Browse and install the Hmi SCADA client application.
Launch the SCADA HMI Client application.
Enter the following information:
Field | Description |
Host Server | IP address or project server name. |
Port | Door 80. |
Polling | Sets the refresh rate between the client and the server, expressed in rooms of a second. The default value of 1 means that the client receives new data from the server every 250 ms. When connecting to servers located on Internet or low bandwidth networks, this value should be increased. For more information, see the app's help. |
User | User name as configured in the project. The default is GUEST |
Password | Password associated with the user name in the project.. |
Project | Project name on the remote server. |
Tap Login.
The graphics and screens are downloaded, and then the application starts. The application when starting for the first time may take a little longer than in subsequent startups.
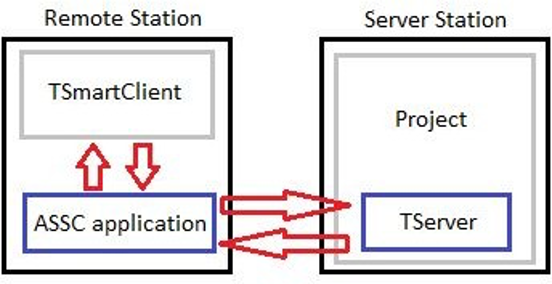
Auto Start Windows Smart Client
The Auto-Start SmartClient (ASSC) watchdog application is used to automatically launch the TSmartClient on the remote stations of your project. This application requires software version 2014.2.12 or newer. When installing the software, the AutoStartSmartClient.exe will be added to the installation folder.
In the current version, the files AutoStartSmartClient.exe and AutoStartSmartClient.exe.config must be manually copied from the server station installation folder to a folder on the remote station. After copying the ASSC application to the remote station, the user must configure the .config file or the ASSC will start with several parameters that will take priority over any parameters in the .config file.
The remote station must have already installed Microsoft .Net Framework 4.0 or 4.5.
When the ASSC application is running on the remote station, the ASSC application checks every 30 seconds to see if the TSmartClient is running or the user can set a time parameter for the application's scan frequency.
If the TSmartClient is not running, the ASSC application consults its configuration parameters to verify that there is communication with the server station. If the ASSC application is able to connect to the project through the TServer on the server station, it restarts the TSmartClient on the remote station using the url parameter.
Parameter Setting
Before you run the ASSC application, you need to set the parameters in the AutoStartSmartClient.exe.config or you can pass the parameters using a shortcut file.
The available parameters are:
url: the SmartClient url found in Info> Redundancy
hidden: a flag (true or false) used to set whether a pop-up is visible or executed in the background.
TRUE: the window runs in the background
FALSE: the window is visible (default)
browser: the browser that will be used to run smartclient. Internet Explorer is the default browser.
timer: The time (in seconds) between each attempt to retry the connection.
IP: The IP from the computer to the computer that runs the runtime service, TServer.exe.
door: the SmartClient listening port. By default, tserver.exe runs on port 3101.
username: The RuntimeUser that is connected. The default user name is guest.
password: a user has created a custom password.
viewonly: A flag (true or false) to see if a project can be edited or just for viewing.
TRUE: the project is for viewing only FALSE: The design can be modified (default)
Configuration Example
To pass the parameters in the file AutoStartSmartClient.exe, you must create a shortcut to the file in a folder on the remote station. To do this, go to the installation folder and look for the executable.
Right-click the file and select Create shortcut. Then place it in the desired folder. To finish the setup, right-click the newly created shortcut and select Properties.
Configure the file path to:
AutoStartSmartClient.exe /url:http://<IP Address>/<binary folder>/TSmartClient.application /timer:<seconds> E.g.: AutoStartSmartClient.exe /url:http://192.168.15.31/xx-8.1/TSmartClient.application /timer:30 |
The url can be copied from the Engineering environment in Info> redundancy> smart client URL. See the image below:

After setting the settings, double-click the shortcut file and keep it running. You should see an open window with a message saying that the application is waiting for tserver to run. Once the project runs, the TSmartClient opens automatically.
The TSmartClient needs a WebServer (ISS or TWebServer) working correctly on the server computer.

On this page:
On this page: