- Created by Jose Porto on Jan 24, 2023
-
 Translations
You are viewing an old version of this page. View the current version.
Compare with Current View Page History
Version 1 Next »
An audit trail (also called audit log) is a security-relevant chronological record, set of records, and/or destination and source of records that provide documentary evidence of the sequence of activities that have affected at any time a specific operation, procedure, or event.
Settings
To use the Audit Trail function, you must enable it. Go to Edit > Alarms > Groups, and click on the Settings button.

A popup display will open with many checkboxes. Besides the Enable option, you can choose which actions will be stored in the Audit Trail database. The options are as follows:
User Logon/Logoff : Stores informational data on user login/logout.

Open/Close Displays: Stores informational data when displays are open or closed.

Remote Connections: Stores information on remote client connections (Smart/Rich Clients).

Custom Messages: Stores added custom messages.

Tag Changes: Stores informational data of every tag change.

Datasets (Insert/Updates or All Commands): Stores information on datasets.

Operator Actions: Stores information on operator actions.

Save Reports: Stores information when the save command is executed.

System Warnings: Stores information related to the system.

It is possible to enable any of these options during runtime by using the Alarm namespace properties. The syntax is:
@Alarm.AuditTrail.<Audit Trail Option> |
To visualize the stored Audit Trail data, you can add an AlarmWindow element to your display and select the AuditTrail option in the ComboBox list.

Custom Messages
One of the most important features of the Audit trail is the ability to have customizable messages added to a historian database. Custom messages are added in runtime using the method below:
@Alarm.AuditTrail.AddCustomMessage(string message, string areaName, string objectName, string value, string itemName, string auxValue, string comment) |
where:
message: The custom message to be added to the Audit
areaName: The area related to this custom message
objectName: The object related to this custom message
value: The object value related to this custom message
itemName: The item name
auxValue: The auxiliary value
comments: The comments
The messages can either be text or a concatenation between text and real time info from the project. For messages that are only text, you will need only the message parameter, e.g.:
@Alarm.AuditTrail.AddCustomMessage("The day is sunny")
|
An example on the usage of text and project info is:
@Alarm.AuditTrail.AddCustomMessage("User: " + @Client.UserName + " logged");
|
Add Translation to Custom Messages
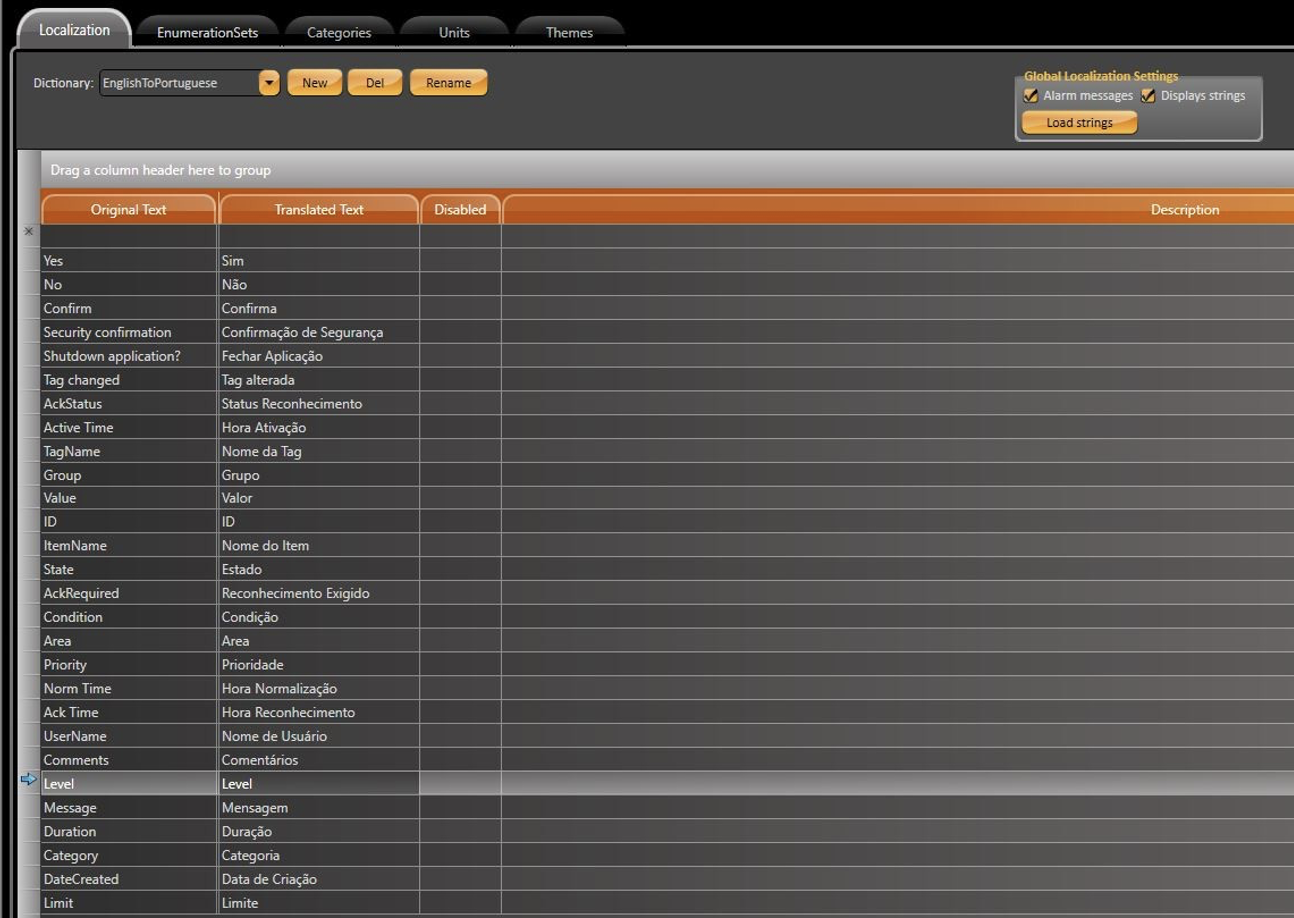
To translate text into different languages, you first need to create a set of words in a custom dictionary. Go to Run > Dictionaries > Localization. On the top of the display, you will find some buttons:

New: Create a new dictionary
Del: Delete an existing dictionary
Rename: Renames an existing dictionary
Load strings: Load project strings that have the Global Localization setting

To apply this feature to the custom messages in the Audit Trail, you must follow a certain syntax.
If the message is text only, the default syntax is:
@Alarm.AuditTrail.AddCustomMessage("tag changed value, AckRequired");
|
If the message is text and project info, you must add the curly brackets char ”{ }” before and after the project info. The message string should look like this:
string message = "User: {" + @Client.UserName + "} logged"
|
Note
The alarm database will contain chars ” { ” and ” } ” in the Message column. The dictionary must also contain the brackets characters.
You must add another string element to the itemName input parameter, as seen below:
string itemName = "{object}"
|
A final AddCustomMessage with localization capabilities should look like this:
@Alarm.AuditTrail.AddCustomMessage("User: {" + @Client.UserName + "} logged", null, null, null, "{object}", null, null);
|
Translating Tags and Tables
For reports with different translation options, the first requirement is the creation of Dictionaries (in Run > Dictionaries > Localization).

To switch between languages, use the property:
@Client.Localization = "" // for default dictionary //or @Client.Localization = "<Dictionary_Name>" |
To have a translated Alarm AuditTrail with Custom Messages and Comments in Reports, the addition of a callback function in Script > Classes > ClientMain is required. This function is called every time the DataGrid object is modified.
The Callback function syntax is as follows:
public void OnReportCustomTableCell(string reportName, string columnName, System.Data.
DataRow row, System.Windows.Documents.TableCell tableCell)
{
// Insert Code Here
}
|
The code added to the callback function is presented below:
public void OnReportCustomTableCell(string reportName, string columnName, System.Data.DataRow row, System.
Windows.Documents.TableCell tableCell)
{
if (row["ItemName"].ToString() == "{object}")
{
string[]  Message_Split_Parts  =  row[columnName].ToString().Split(’{’,  ’}’); string Translated_Message = "";

for (int i = 0; i <= Message_Split_Parts.Length - 1; i++) {

// Translate the custom message part
Translated_Message += @Client.Locale(Message_Split_Parts[i]);

Run  cellText  =  (tableCell.Blocks.FirstBlock  as  Paragraph).Inlines.FirstInline  as  Run;

// Replace the original message with the translated one. cellText.Text = Translated_Message;
}

}
}
|
The Datagrid language will depend on the dictionary that was enabled when the report was saved.
Nesta pagina:
- No labels